News
Jun 11, 2013
Duke MOOCs: Recording demonstrations for “Introduction to Chemistry”

admin
For most lecture videos in Coursera, faculty use a recording kit, set up to specifications recommended by Coursera, to produce their lectures with PowerPoint slides, narration, and handwritten or drawn annotations. However, sometimes faculty need to show things that can’t be staged in their office or the Multimedia Project Studio with a single camera or […]
For most lecture videos in Coursera, faculty use a recording kit, set up to specifications recommended by Coursera, to produce their lectures with PowerPoint slides, narration, and handwritten or drawn annotations. However, sometimes faculty need to show things that can’t be staged in their office or the Multimedia Project Studio with a single camera or that require video equipment with high definition or slow motion video capabilities to record properly.
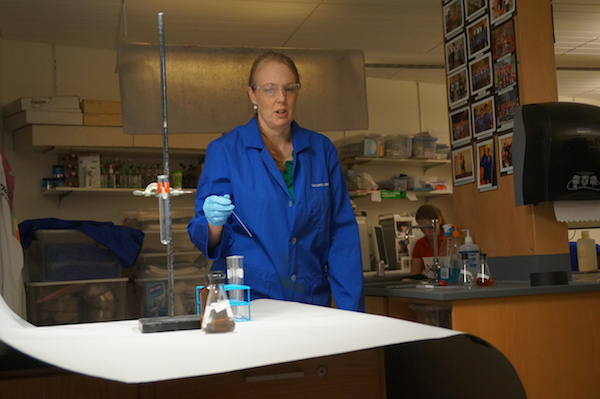
Dr. Dorian Canelas, Instructor in the Department of Chemistry, who is in the planning stages of her Coursera course, “Introduction to Chemistry”, wanted to record experiments that would be inserted into her video lectures to demonstrate various concepts. In her classes, Dorian sometimes performs the experiments herself, but also works with Dr. Kenneth Lyle who stages experiments in classes for the department and is involved in outreach on chemistry to public school students and teachers. Since several of her lectures will be based around these experiments, it made sense to record them first so they could be dropped into the lectures as she records them over the next few months in anticipation of offering the Coursera course in early 2014. (“Introduction to Chemistry” is one of ten new Coursera courses for 2013-2014 announced in April as part of Duke’s online course initiative.)
Working with Elizabeth Evans and Mich Donovan in Duke’s Office of Information Technology, one of CIT’s partners in the university’s Coursera project, Dorian put together detailed descriptions and information on each experiment that needed to be recorded. Her notes included:
- a script describing the action happening during each demonstration,
- a list of materials needed to perform the experiment,
- safety considerations during shooting and if googles or other safety equipment were needed during the demonstration,
- the outcome and main points of the experiment to highlight what visuals or audio needed to be captured,
- notes on the scale and space needed for the demonstration, from a table top to a larger outdoors space,
- notes on special lighting or technical work, such as slow motion, that was needed to show a process or outcome of an experiment.
Some funding is set aside in the Coursera initiative for special video recording sessions such as these and Elizabeth worked with Scott Wells and his team in Duke Media Services to come up with a budget for the project and an estimate on how long the video recording sessions might take. During the planning process, Scott went to Ken’s lab to discuss the list and how the lab could be set up for the sessions.
To speed the process of recording, the experiments were divided into groups of setups that were similar – the demonstrations could be performed, one after another, with only minimal changes in camera placement and lighting. Most of the experiments were shot in a day and a half in Ken’s lab. Another shoot is scheduled to show some experiments outdoors that need additional space or ventilation for the chemicals involved.
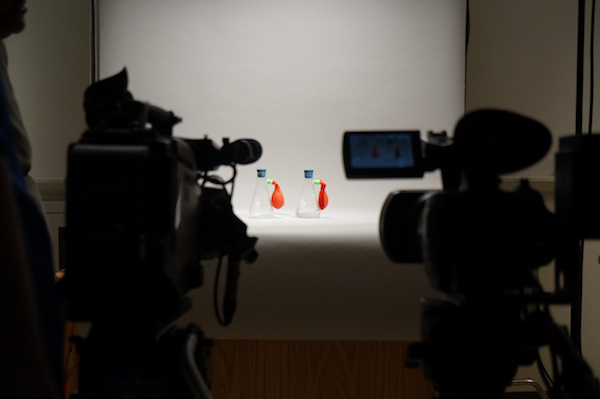
For the shoot, DMS used two cameras. One covered the full scene of the demonstration and the other was used for closeups. A roll of gray background paper was used so that the components used in the experiments would be visible and to provide a neutral background where graphics, such as labels highlighting parts of the experiments, could be superimposed later. Some demonstrations were shot with space on the left, right or bottom of the screen so that text or video inserts could be added to the shot.
No special microphones were used in the shooting, although sound was captured by the cameras. Ken described each demonstration as it was performed and noted chemicals or components that were used. In the final lecture, this original sound will be removed and replaced with narration from Dorian – she’ll use Ken’s descriptions as a reference when she records her voice-overs.
A video monitor was used by Dorian and others at the session to view each demonstration as it was recorded to make sure that all the components used were visible and properly framed and to check the lighting. Some of the experiments produced specific colors of chemical mixes or flames and the monitor was used to see how closely these matched the “live” demonstration. A few, because of the difficulty in capturing the exact colors with video equipment, will be adjusted slightly by DMS to reflect the actual colors seen in the “live” demonstration.
For one of the first experiments recorded, Ken improvised a blue card background to make sure that the vapor from a piece of dry ice was visible on camera. Some of the demonstrations, showing colored flames or light spectrums were shot in darkness or near darkness.

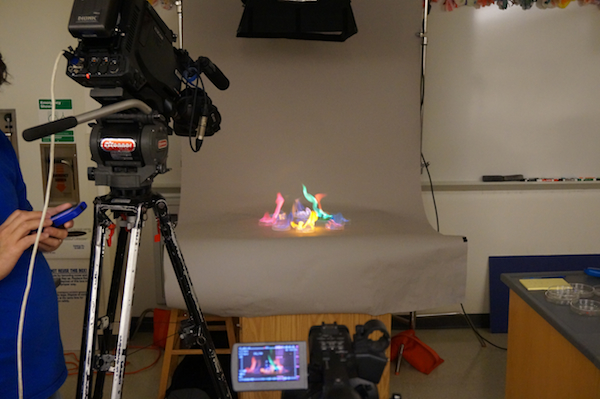
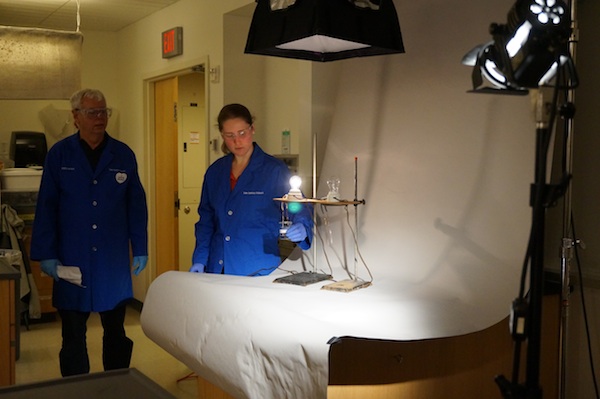
The lighting setup for most of the experiments was fairly simple – an overhead light for soft illumination of the whole scene and a key light on the side that was moved to highlight the components in specific ways. These lighting setups took time as Ken would go through a rehearsal of the demonstration and adjustments were made based on what we were seeing on the video monitor.
In the example below, the key light was shown only on the beakers on the table so that the light from the lamps above them could be clearly seen.
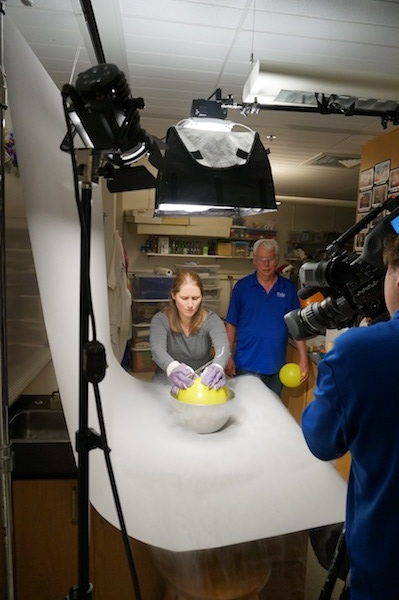
In this still, the camera is placed higher to get an overhead shot of a ballon in a bowl of liquid nitrogen.
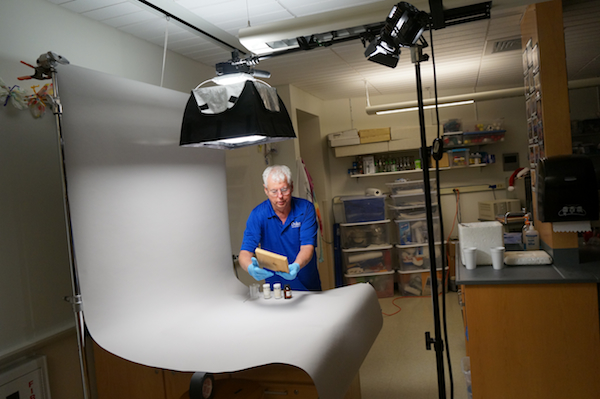
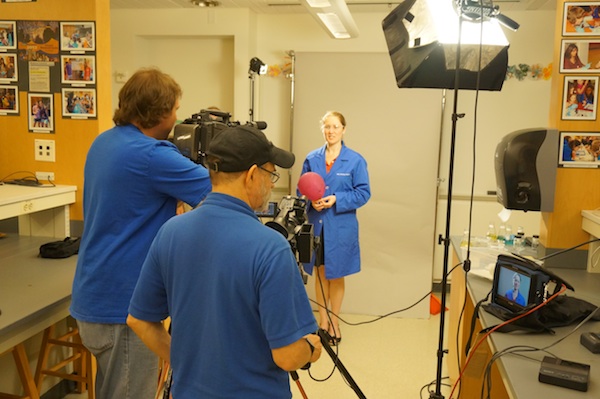
Some of the experiments were repeated and shot multiple times or done in sections so that different camera and lighting setups could be used and the parts combined together for the final video. In the still below, we see the setup for a closeup shot of Mary Jane Simpson, a Duke student who assisted Ken with the demonstrations, that will be combined with footage shot earlier in the day where static electricity of the balloon bends the flow of water – the shot of the ballon being charged had to be done separately since it was “out of frame” of the rest of the demonstration.
With the shooting done, DMS will take the high definition footage and make edits and prep work before exporting it into MP4 format that Dorian can use to insert directly into her video lectures in ScreenFlow with the recording kit.
Check back at the CIT’s website for more information on “Introduction to Chemistry” as it is developed this summer and fall.


